 |
|
|
| ◆ | sambaのインストール |
|
[root@centos]# dnf -y install samba |
|
| ◆ | ユーザーの作成 |
| 既存のユーザーを samba の接続ユーザーとする | |
|
[root@centos]# pdbedit -a ***** (***** ユーザー名) new password: ****** <--- パスワード入力(* は実際には表示されません) retype new password: ****** <--- パスワード再入力(* は実際には表示されません) |
|
| ◆ | samba の設定 |
|
[root@centos]# vi /etc/samba/smb.conf # See smb.conf.example for a more detailed config file or # read the smb.conf manpage. # Run 'testparm' to verify the config is correct after # you modified it. [global] (接続設定) workgroup = SAMBA <--- 書き換え(ワークグループ) ↓ workgroup = ********* server string = SAMBA SERVER Version %v <--- 追記(Samba サーバーアクセス時詳細表示名) netbios name = PAPA-NET.samba <--- 追記(NetBios(Windows)用 Samba サーバー名) security = user passdb backend = tdbsam unix charset = UTF-8 <--- 追記(Linux 側用文字コード) dos charset = CP932 <--- 追記(Windows 側用文字コード) wins support = yes <--- 追記(Wins(NetBios(Windows)) サーバー機能をサポートする) printing = cups printcap name = cups load printers = yes cups options = raw [homes] (共有フォルダ設定) comment = Home Directories valid users = %S, %D%w%S browseable = No <--- 書き換え(フォルダ表示) ↓ browseable = yes read only = No inherit acls = Yes [printers] (プリンター設定) <--- 他のプリンター共有設定があったり、プリンター共有 comment = All Printers 設定を利用しない場合は以下全てコメント化 path = /var/tmp printable = Yes create mask = 0600 browseable = No [print$] (プリンター設定) <--- 他のプリンター共有設定があったり、プリンター共有 comment = Printer Drivers 設定を利用しない場合は以下全てコメント化 path = /var/lib/samba/drivers write list = @printadmin root force group = @printadmin create mask = 0664 directory mask = 0775 |
|
| 上記設定の構文チェック | |
|
[root@centos]# testparm Load smb config files from /etc/samba/smb.conf rlimit_max: increasing rlimit_max (1024) to minimum Windows limit (16384) Processing section "[homes]" Processing section "[printers]" Processing section "[print$]" Loaded services file OK. Server role: ROLE_STANDALONE Press enter to see a dump of your service definitions <--- Enter 以下設定内容が表示 |
|
| 上記のように OK が表示され Enter 後設定内容が表示されればOK | |
| ◆ | 共有ディレクトリの作成 |
|
[root@centos]# mkdir /home/share |
|
| アクセス権を変更 | |
|
[root@centos]# chmod 777 /home/share |
|
| 所有者を変更 | |
|
[root@centos]# chown nobody:nobody /home/share |
|
| ◆ | 共有ディレクトリの設定 |
|
[root@centos]# vi /etc/samba/smb.conf [share] <--- 以下最終行に追記 comment = Gust Only Space path = /home/share share modes = yes public = yes writable = yes guest ok = yes create mask = 0777 directory mask = 0777 ※設定の詳細は下記「設定の詳細」を参照 |
|
| 設定の詳細 path = /home/***** (***** はユーザ名) public = yes guest ok = yes guest only = yes guest account = ***** (*****
はユーザ名) read only = yes writable = yse create mask = 0777 (0777 の 777
部分に指定するアクセス権を記述) directory mask = 0777 (0777 の 777
部分に指定するアクセス権を記述) force user = yes browseable = yes valid users = ***** (***** はユーザ名) invalid users = ***** (*****
はユーザ名) write list = ***** (***** はユーザ名) hosts allow = ***** (***** はホスト名) hosts deny= ***** (***** はホスト名) 上記詳細で yes の部分を no に設定すると逆の意味になります。 |
|
| ◆ | samba の起動 |
|
[root@centos]# systemctl start smb nmb |
|
| ※ nmb は基本的には smb を起動した時に自動的に一緒に起動してくれるが Windows や DNS の設定によっては起動しない場合もあるようなので明示的に起動させる | |
| 自動起動設定 | |
|
[root@centos]# systemctl enable smb nmb |
|
| 自動起動設定の確認 | |
|
[root@centos]# systemctl is-enabled smb nmb enabled <--- enabled になっていればOK enabled <--- enabled になっていればOK |
|
| ◆ | クライアントからの接続確認 |
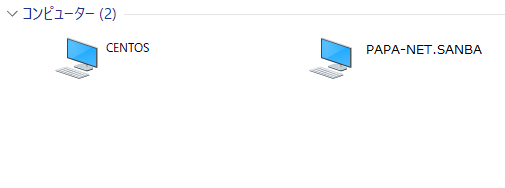
| WindowsPCのネットワークを起動し『samba の設定 』で設定した samba サーバー名『 PAPA-NET.SAMBA』あることを確認 | |
|
|
|
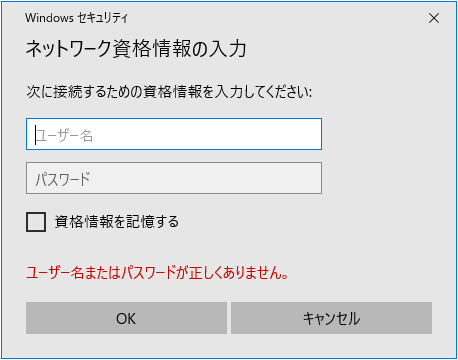
| Windows やセキュリティーの関係で上記ようにアイコンが表示されない場合はネットワークのアドレスバーにサーバーのアドレス(IPアドレスを入力(\\192.168.1.***) | |
| 上記で設定した『ユーザー名」・『パスワード』を入力し『OK』をクリック | |
|
|
|
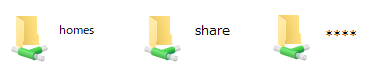
| 共有フォルダー share と上記で設定したユーザーのフォルダー 及び homes がある事を確認し、それぞれにアクセスして確認 | |
| 尚、homes はユーザーの home でもある | |
|
|
|
| ◆ | クライアントのブラウザから samba の設定 |
| Webmin を利用 | |
| Webmin のインストール 及び設定は当サイトの 『サーバー機の各種設定(webmin)』 を参照 | |
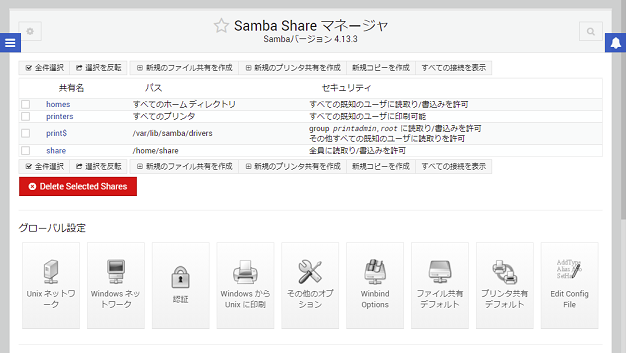
| ◆ | Webmin での samba 設定 |
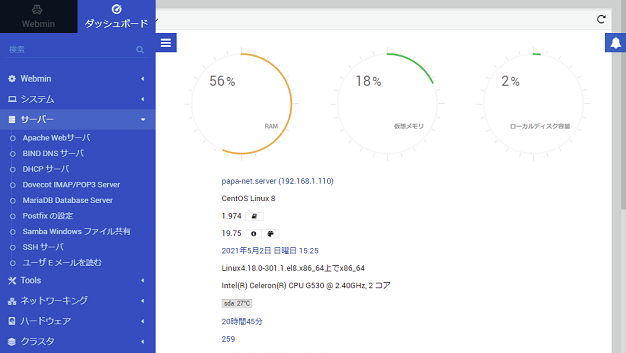
| Webminm にサインインしたら右上の青いメニューアイコンをクリックし 『Samba Windows ファイル共有』 | |
|
|
|
| samba の各種設定を行う | |
|
|
|