 |
|
|
| ◆ | MariaDB のインストール |
| CentOS 7 よりデータベースサーバーが MySQL から MariaDB に変更なった | |
|
[root@centos]# dnf -y install mariadb-server |
|
| ◆ | MariaDB の設定 |
|
[root@centos]# vi /etc/my.cnf.d/mariadb-server.cnf # # These groups are read by MariaDB server. # Use it for options that only the server (but not clients) should see # # See the examples of server my.cnf files in /usr/share/mysql/ # 以下追記 文字化防止に utf8mb4 を設定 [client] default-character-set = utf8mb4 # this is read by the standalone daemon and embedded servers [server] # this is only for the mysqld standalone daemon # Settings user and group are ignored when systemd is used. # If you need to run mysqld under a different user or group, # customize your systemd unit file for mysqld/mariadb according to the # instructions in http://fedoraproject.org/wiki/Systemd [mysqld] 以下追記 文字化防止に utf8mb4 を設定 character-set-server = utf8mb4 datadir=/var/lib/mysql socket=/var/lib/mysql/mysql.sock log-error=/var/log/mariadb/mariadb.log pid-file=/run/mariadb/mariadb.pid # # * Galera-related settings # [galera] # Mandatory settings #wsrep_on=ON #wsrep_provider= #wsrep_cluster_address= #binlog_format=row #default_storage_engine=InnoDB #innodb_autoinc_lock_mode=2 # # Allow server to accept connections on all interfaces. # #bind-address=0.0.0.0 # # Optional setting #wsrep_slave_threads=1 #innodb_flush_log_at_trx_commit=0 # this is only for embedded server [embedded] # This group is only read by MariaDB servers, not by MySQL. # If you use the same .cnf file for MySQL and MariaDB, # you can put MariaDB-only options here [mariadb] # This group is only read by MariaDB-10.3 servers. # If you use the same .cnf file for MariaDB of different versions, # use this group for options that older servers don't understand [mariadb-10.3] |
|
| ◆ | MariaDB の起動 |
|
[root@centos]# systemctl start mariadb |
|
| PCの再起動に mariadb を自動的に起動するように設定 | |
|
[root@centos]# systemctl enable mariadb |
|
| 自動起動設定の確認 | |
|
[root@centos]# systemctl is-enabled mariadb enabled <--- enabled になっていればOK |
|
| ◆ | MariaDB の設定 |
|
[root@centos]# mysql_secure_installation NOTE: RUNNING ALL PARTS OF THIS SCRIPT IS RECOMMENDED FOR ALL MariaDB SERVERS IN PRODUCTION USE! PLEASE READ EACH STEP CAREFULLY! In order to log into MariaDB to secure it, we'll need the current password for the root user. If you've just installed MariaDB, and you haven't set the root password yet, the password will be blank, so you should just press enter here. Enter current password for root (enter for none): <--- 空白のまま Enter を押す OK, successfully used password, moving on... Setting the root password ensures that nobody can log into the MariaDB root user without the proper authorisation. Set root password? [Y/n] <--- 空白のまま Enter を押す(root のパスワード設定) New password:******** <--- パスワードの入力 Re-enter new password:******** <--- 再度パスワードの入力 Password updated successfully! Reloading privilege tables.. ... Success! By default, a MariaDB installation has an anonymous user, allowing anyone to log into MariaDB without having to have a user account created for them. This is intended only for testing, and to make the installation go a bit smoother. You should remove them before moving into a production environment. Remove anonymous users? [Y/n] <--- 空白のまま Enter を押す(匿名ユーザーの削除) ... Success! Normally, root should only be allowed to connect from 'localhost'. This ensures that someone cannot guess at the root password from the network. Disallow root login remotely? [Y/n] <--- 空白のまま Enter を押す(リモートからのrootログイン禁止) ... Success! By default, MariaDB comes with a database named 'test' that anyone can access. This is also intended only for testing, and should be removed before moving into a production environment. Remove test database and access to it? [Y/n] <--- 空白のまま Enter を押す(不要なデータベース - Dropping test database... test の削除) ... Success! - Removing privileges on test database... ... Success! Reloading the privilege tables will ensure that all changes made so far will take effect immediately. Reload privilege tables now? [Y/n] <--- 空白のまま Enter を押す ... Success! Cleaning up... All done! If you've completed all of the above steps, your MariaDB installation should now be secure. Thanks for using MariaDB! |
|
| ◆ | MariaDB の確認 |
|
[root@centos]# mysql -u root -p******** <--- ******** はパスワード Welcome to the MariaDB monitor. Commands end with ; or \g. Your MariaDB connection id is 14 Server version: 5.5.37-MariaDB MariaDB Server Copyright (c) 2000, 2014, Oracle, Monty Program Ab and others. Type 'help;' or '\h' for help. Type '\c' to clear the current input statement. MariaDB [(none)] select user,host,password from mysql.user; <--- パスワード登録確認 +------+-----------+---------------------------------------+ | user | host | password | +------+-----------+---------------------------------------+ | root | localhost | *1234567890abcdefghijklmnopqrstuvwxyz | | root | 127.0.0.1 | *1234567890abcdefghijklmnopqrstuvwxyz | | root | ::1 | *1234567890abcdefghijklmnopqrstuvwxyz | +------+-----------+---------------------------------------+ 3 rows in set (0.00 sec) MariaDB [(none)]> select host,user from mysql.user; <--- ユーザー確認 +-----------+------+ | host | user | +-----------+------+ | 127.0.0.1 | root | | ::1 | root | | localhost | root | +-----------+------+ 3 rows in set (0.00 sec) MariaDB [(none)]> show databases; <--- データベース確認 +--------------------+ | Database | +--------------------+ | information_schema | | mysql | | performance_schema | +--------------------+ 3 rows in set (0.03 sec) MariaDB [(none)]> show variables like '%char%'; <--- 文字コード確認 +--------------------------+----------------------------+ | Variable_name | Value | +--------------------------+----------------------------+ | character_set_client | utf8mb4 | | character_set_connection | utf8mb4 | | character_set_database | utf8mb4 | | character_set_filesystem | binary | | character_set_results | utf8mb4 | | character_set_server | utf8mb4 | | character_set_system | utf8 | | character_sets_dir | /usr/share/mysql/charsets/ | +--------------------------+----------------------------+ 8 rows in set (0.01 sec) MariaDB [(none)]> delete from mysql.user where user='****'; <--- ユーザ **** の削除(参考) MariaDB [(none)]> drop database ********; <--- データベース ******** の削除(参考) MariaDB [(none)]> exit <--- 終了 |
|
| ◆ | php のインストール |
|
[root@centos]# dnf install -y php php-mbstring php-xml php-xmlrpc php-gd php-pdo php-mysqlnd php-json |
|
| ◆ | phpmyadmin のインストール |
| apache のDocumentRootに移動 | |
|
通常は/var/www/htmlですが自分の環境に合わせる(当サイトの場合は/home/****/www) |
|
|
[root@centos]# cd /home/****/www |
|
|
phpmyadmin のダウンロード・展開・リネーム |
|
|
[root@centos www]# wget https://files.phpmyadmin.net/phpMyAdmin/5.1.0/phpMyAdmin-5.1.0-all-languages.zip [root@centos www]# unzip phpMyAdmin-5.1.0-all-languages.zip [root@centos www]# mv phpMyAdmin-5.1.0-all-languages phpmyadmin |
|
|
ダウンロードしたzipファイルを削除 |
|
|
[root@centos www]# rm -rf phpMyAdmin-5.1.0-all-languages.zip |
|
|
ダウンロード・展開したconfig.sample.inc.phpをconfig.inc.php名にリネーム |
|
|
[root@centos www]# cp /home/****/www/phpmyadmin/config.sample.inc.php /home/****/www/phpmyadmin/config.inc.php |
|
|
起動時のエラー回避設定 |
|
|
[root@centos www]# vi /home/****/www/phpmyadmin/config.inc.php <?php /** * phpMyAdmin sample configuration, you can use it as base for * manual configuration. For easier setup you can use setup/ * * All directives are explained in documentation in the doc/ folder * or at <https://docs.phpmyadmin.net/>. */ declare(strict_types=1); /** * This is needed for cookie based authentication to encrypt password in * cookie. Needs to be 32 chars long. */ $cfg['blowfish_secret'] = ''; /* YOU MUST FILL IN THIS FOR COOKIE AUTH! */ ↓ ↓--- 追記32文字以上の任意の文字 $cfg['blowfish_secret'] = 'afssav14b3db4bg4xczgff145414vgs35trbv'; /* YOU MUST FILL IN THIS FOR COOKIE AUTH! */ /** * Servers configuration */ $i = 0; /** * First server */ $i++; /* Authentication type */ $cfg['Servers'][$i]['auth_type'] = 'cookie'; /* Server parameters */ $cfg['Servers'][$i]['host'] = 'localhost'; $cfg['Servers'][$i]['compress'] = false; $cfg['Servers'][$i]['AllowNoPassword'] = false; 追記 $cfg['Servers'][$i]['connect_type'] = 'socket'; $cfg['Servers'][$i]['socket'] = '/var/lib/mysql/mysql.sock'; 以下略 |
|
| phpmyadminに移動 | |
|
通常は/var/www/html/phpmyadminですが自分の環境に合わせる(当サイトの場合は/home/****/www/phpmyadmin) |
|
|
[root@centos]# cd /home/****/www/phpmyadmin |
|
|
phpMyAdminの実行時にテンプレートをキャッシュするための一時保存用フォルダtmpを作成 |
|
|
[root@centos phpmyadmin]# mkdir tmp <--- フォルダの作成 [root@centos phpmyadmin]# chmod -R 755 tmp <--- アクセス権の変更 |
|
| ◆ | MySQL の再起動 |
|
[root@centos]# systemctl restart mysqld <--- 入力 |
|
| ◆ | Apache の再起動 |
|
[root@centos]# systemctl restart httpd <--- 入力 |
|
| ◆ | phpMyAdmin の起動 |
|
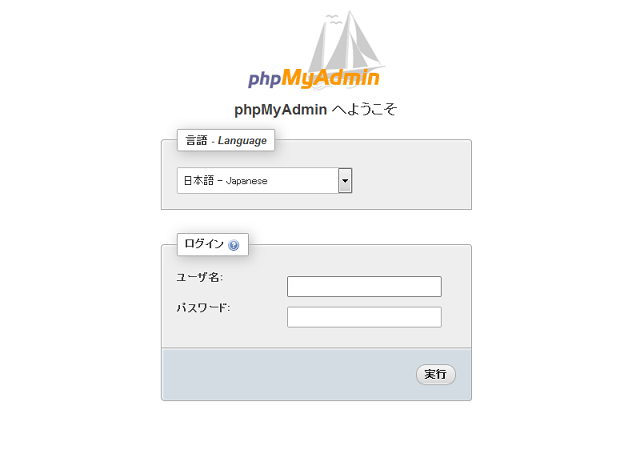
インターネットブラウザを起動してアドレス欄にサーバーのアドレスの後に /phpmyadmin
と追加して入力(http://192.168.1.**/phpmyadmin) 下図のような画面が表示されますので『ユーザー名:』&『パスワード:』に MySQL で設定したユーザー名&パスワードを入力して『実行する』をクリック |
|
|
|
|
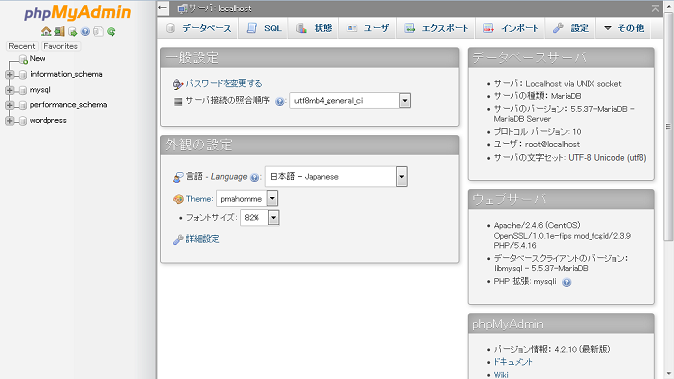
| 下図のようなページが画面が開くので必要に応じて設定 | |
|
|
|