 |
|
|
| ◆ | Clam AntiVirus のインストール(ウィルスソフト) |
| このサイトの『 yum 用リポジトリ追加 』を先に実行しておく事 | |
| バージョン: clamav.x86_64 0:0.99.4-1 | |
|
[root@centos]# yum --enablerepo=epel install clamav clamav-server clamav-server-systemd clamav-update clamav-scanner (1行で入力 ) |
|
| ◆ | ウィルス定義ファイルの最新化 |
| 設定ファイルの設定 | |
|
[root@centos]# vi /etc/freshclam.conf ## ## Example config file for freshclam## Please read the freshclam.conf(5) manual before editing ## this file. # Comment or remove the line below. #Example コメント化されている事を確認 途中略 # Send the RELOAD command to clamd. # Default: no #NotifyClamd /path/to/clamd.conf コメントを解除して書き替え(ウイルス定義ファイル更新をclamdに通知) ↓ NotifyClamd /etc/clamd.d/scan.conf 以下略 |
|
| 自動更新設定ファイルの設定 | |
|
[root@centos]# vi /etc/sysconfig/freshclam 全ての行がコメント化されている事を確認 ## When changing the periodicity of freshclam runs in the crontab, ## this value must be adjusted also. Its value is the timespan between ## two subsequent freshclam runs in minutes. E.g. for the default ## ## | 0 */3 * * * ... ## ## crontab line, the value is 180 (minutes). # FRESHCLAM_MOD= ## A predefined value for the delay in seconds. By default, the value is ## calculated by the 'hostid' program. This predefined value guarantees ## constant timespans of 3 hours between two subsequent freshclam runs. ## ## This option accepts two special values: ## 'disabled-warn' ... disables the automatic freshclam update and ## gives out a warning ## 'disabled' ... disables the automatic freshclam silently # FRESHCLAM_DELAY= |
|
| ◆ | ウィルス定義ファイルの最新化 |
|
[root@centos]# freshclam ClamAV update process started at Sun May 27 15:55:36 2018 WARNING: Your ClamAV installation is OUTDATED! WARNING: Local version: 0.99.4 Recommended version: 0.100.0 DON'T PANIC! Read http://www.clamav.net/documents/upgrading-clamav main.cvd is up to date (version: 58, sigs: 4566249, f-level: 60, builder: sigmgr) Downloading daily-24357.cdiff [100%] Downloading daily-24358.cdiff [100%] Downloading daily-24359.cdiff [100%] 途中略 Downloading daily-24605.cdiff [100%] Downloading daily-24606.cdiff [100%] Downloading daily-24607.cdiff [100%] daily.cld updated (version: 24607, sigs: 1963105, f-level: 63, builder: neo) bytecode.cvd is up to date (version: 319, sigs: 75, f-level: 63, builder: neo) Database updated (6529429 signatures) from database.clamav.net (IP: 104.16.186.138) ERROR: Please edit the example config file /etc/clamd.d/scan.conf ERROR: NotifyClamd: Can't find or parse configuration file /etc/clamd.d/scan.conf |
|
| ◆ | clamav 設定ファイルの設定 |
|
[root@centos]# vi /etc/clamd.d/scan.conf ## ## Example config file for the Clam AV daemon ## Please read the clamd.conf(5) manual before editing this file. ## # Comment or remove the line below. Example コメント化 ↓ #Example 途中略 # Path to a local socket file the daemon will listen on. # Default: disabled (must be specified by a user) #LocalSocket /var/run/clamd.scan/clamd.sock コメント解除 ↓ LocalSocket /var/run/clamd.scan/clamd.sock 途中略 # Run as another user (clamd must be started by root for this option to work) # Default: don't drop privileges User clamscan コメント化 ↓ #User clamscan 以下略 |
|
| ◆ | Clamの起動 |
|
[root@centos]# systemctl start clamd@scan |
|
| ◆ | Clamの自動起動設定 |
|
[root@centos]# systemctl enable clamd@scan |
|
| ◆ | 自動起動設定確認 |
|
[root@centos]# systemctl list-unit-files | grep clamd@scan clamd@scan.service enable enable になっていればOK |
|
| ◆ | ウィルススキャンを実行 |
|
[root@centos]# clamdscan -c /etc/clamd.d/scan.conf --remove /root: OK ウィルスなし ----------- SCAN SUMMARY ----------- Infected files: 0 Time: 85.906 sec (1 m 25 s) |
|
| ◆ | テスト用ウィルスのダウンロード |
|
[root@centos]# wget http://www.eicar.org/download/eicar.com.txt [root@centos]# wget http://www.eicar.org/download/eicar_com.zip |
|
| ◆ | 再度ウィルススキャンを実行 |
|
[root@centos]# clamdscan -c /etc/clamd.d/scan.conf --remove /root/eicar_com.zip: Eicar-Test-Signature FOUND 上記でダウンロードした二つのウィルスを検出し /root/eicar_com.zip: Removed. 削除 /root/eicar.com.txt: Eicar-Test-Signature FOUND /root/eicar.com.txt: Removed. ----------- SCAN SUMMARY ----------- Infected files: 2 Time: 5.456 sec (0 m 5 s) |
|
| ◆ | ウィルススキャンの自動化 |
|
[root@centos]# vi /etc/cron.daily/clamdscan 以下新規記述 #!/bin/sh PATH=/usr/bin:/bin CONFIG=/etc/clamd.d/scan.conf # --- update --- clam のアップデート yum --enablerepo=epel -y update clamd > /dev/null 2>&1 # --- fresh --- ウィルス定義ファイルの更新 /usr/bin/freshclam > /dev/null 2>&1 # --- scan --- ウィルススキャンの実行 CLAMSCANTMP=`mktemp` /usr/bin/clamscan --infected --remove --recursive / > $CLAMSCANTMP 2>&1 [ ! -z "$(grep FOUND$ $CLAMSCANTMP)" ] && \ # --- mail --- ウィルススキャンの実行結果のメール送信 grep FOUND$ $CLAMSCANTMP | mail -s "Virus Found in `hostname`" root rm -f $CLAMSCANTMP |
|
| 実行権限の付与 | |
|
[root@centos]# chmod 755 /etc/cron.daily/clamdscan |
|
| ◆ | SpamAssassinのインストール |
| バージョン: spamassassin-3.4.0-2 | |
|
[root@centos]# yum -y install spamassassin [root@centos]# yum --enablerepo=epel -y install spamass-milter-postfix |
|
| ◆ | SpamAssassin設定 |
|
[root@centos]# vi /etc/mail/spamassassin/v310.pre 途中略 # TextCat - language guesser # #loadplugin Mail::SpamAssassin::Plugin::TextCat コメント解除 ↓ loadplugin Mail::SpamAssassin::Plugin::TextCat 以下略 |
|
| ◆ | SpamAssassin設定ファイル最新化スクリプト作成 |
|
[root@centos]# vi /etc/cron.daily/spamassassin-update 以下新規記述 #!/bin/bash cd /etc/mail/spamassassin wget -qN http://www.flcl.org/~yoh/user_prefs diff user_prefs user_prefs.org > /dev/null 2>&1 if [ $? -ne 0 ]; then cp user_prefs local.cf echo "report_safe 0" >> local.cf echo "rewrite_header Subject ***SPAM***" >> local.cf if [ -f /etc/rc.d/init.d/spamassassin ]; then /etc/rc.d/init.d/spamassassin restart > /dev/null else systemctl restart spamassassin > /dev/null fi fi cp user_prefs user_prefs.org |
|
| ◆ | SpamAssassin設定ファイル最新化スクリプト実行権限付加 |
|
[root@centos]# chmod +x /etc/cron.daily/spamassassin-update |
|
| ◆ | SpamAssassin設定ファイル最新化スクリプト実行 |
|
[root@centos]# /etc/cron.daily/spamassassin-update |
|
|
|
|
| ◆ | スパム定義ファイルの更新回数の設定 |
| デフォルトの状態では毎日4時10分に更新を実行するように設定されているが変更可能 | |
|
[root@centos]# vi /etc/cron.d/sa-update 10 4 * * * root /usr/share/spamassassin/sa-update.cron 2>&1 | tee -a /var/log/sa-update.log |
|
| ◆ | spamass-milter起動 |
|
[root@centos]# systemctl start spamass-milter |
|
|
|
|
| spamass-milter の自動起動設定 | |
|
[root@centos]# systemctl enable spamass-milter |
|
|
|
|
| 自動起動設定の確認 | |
|
[root@centos]# systemctl list-unit-files | grep spamass-milter spamass-milter-root.service disabled spamass-milter.service enabled enable になっていればOK |
|
| ◆ | procmail設定ファイル作成 |
|
[root@centos]# vi /etc/procmailrc 以下新規記述 SHELL=/bin/bash PATH=/usr/bin:/bin DROPPRIVS=yes MAILDIR=$HOME/Maildir DEFAULT=$MAILDIR/ LOGFILE=$HOME/.procmail.log # ログ出力先 VERBOSE=ON # 詳細ログ出力 ※Spam-Levelが一定値以上の場合は削除 \* = 1レベル(ここでは20レベル) :0 * ^X-Spam-Level: \*\*\*\*\*\*\*\*\*\*\*\*\*\*\*\*\*\*\*\* /dev/null |
|
| ◆ | procmailログファイル作成 |
|
[root@centos]# vi /etc/logrotate.d/procmail 以下新規記述 /home/*/.procmail.log { missingok missingok nocreate notifempty } |
|
|
|
|
| ◆ | Postfix の設定 |
|
[root@centos]# vi /etc/postfix/main.cf 途中略 #mailbox_command = /some/where/procmail #mailbox_command = /some/where/procmail -a "$EXTENSION" mailbox_command = /usr/bin/procmail 追記 以下略 |
|
| Postfix の再起動 | |
|
[root@centos]# systemctl restart postfix |
|
| ◆ |
スパムメールの振り分け受信(サーバー側) |
| 上記の設定ではサーバーにメールが届いた時点でウィルスメールとスパムメールを駆除する設定になっているが、ウィルスメールはこのままの設定で問題はないがスパムメールについてはスパムメールと判断されてしまった普通のメールがある可能性がある のでスパムメールと判断されたメールもとりあえず駆除しないでクライアントに送り、クライアント側で振り分ける設定を行う | |
|
[root@centos]# vi /etc/amavisd/amavisd.conf use strict; # a minimalistic configuration file for amavisd-new with all necessary settings ## see amavisd.conf-default for a list of all variables with their defaults; # for more details see documentation in INSTALL, README_FILES/* # and at http://www.ijs.si/software/amavisd/amavisd-new-docs.html # COMMONLY ADJUSTED SETTINGS: $undecipherable_subject_tag = ''; 追記 # @bypass_virus_checks_maps = (1); # controls running of anti-virus code # @bypass_spam_checks_maps = (1); # controls running of anti-spam code コメント解除) ↓ @bypass_spam_checks_maps = (1); # $bypass_decode_parts = 1; # controls running of decoders&dearchivers $max_servers = 2; # num of pre-forked children (2..30 is common), -m $daemon_user = 'amavis'; # (no default; customary: vscan or amavis), -u $daemon_group = 'amavis'; # (no default; customary: vscan or amavis), -g $mydomain = 'example.com'; # a convenient default for other settings 書き換え(ドメイン名) ↓ $mydomain = 'papa-net.info'; 途中略 $final_virus_destiny = D_DISCARD; $final_banned_destiny = D_BOUNCE; $final_spam_destiny = D_DISCARD; <--- 書き換え(スパムメールと判断したメールも駆除しない) ↓ $final_spam_destiny = D_PASS; $final_bad_header_destiny = D_BOUNCE; 途中略 # ### http://www.csupomona.edu/~henson/www/projects/SAVI-Perl/ # ['Sophos SAVI', \&ask_daemon, ['{}','savi-perl:'] ], # ['Avira SAVAPI', # \&ask_daemon, ["*", 'savapi:/var/tmp/.savapi3', 'product-id'], # qr/^(200|210)/m, qr/^(310|420|319)/m, # qr/^(?:310|420)[,\s]*(?:.* <<< )?(.+?)(?: ; |$)/m ], # settings for the SAVAPI3.conf: ArchiveScan=1, HeurLevel=2, MailboxScan=1 ### http://www.clamav.net/ ['ClamAV-clamd', \&ask_daemon, ["CONTSCAN {}\n", "/var/run/clamd.amavisd/clamd.sock"], <--- 書き換え ↓ \&ask_daemon, ["CONTSCAN {}\n", "/var/run/clamav/clamd.sock"], qr/\bOK$/m, qr/\bFOUND$/m, qr/^.*?: (?!Infected Archive)(.*) FOUND$/m ], 以下略 |
|
| ◆ | amavisd の起動 |
|
[root@centos]# systemctl start amavisd |
|
| ◆ | スパムメールの振り分け受信(クライアント側) |
|
Windowsがクライアントとしての設定 Windows XP までは Outlook Express で Windows Vista 以降では Windowsメール になっていますが設定は同じ |
|
| Outlook Express 及び Windowsメール を起動 | |
| “ローカル フォルダ”にマウスを持って行き右クリックして“フォルダの作成”をクリックして開き“フォルダ名”に“スパムメール”と入力して「OK」 をクリック | |
|
|
|
| タスクバーの“ツール”⇒“メッセージルール”⇒“メール”をクリックし、『メッセージルール』のダイアログが開いたら“新規作成をクリック | |
|
|
|
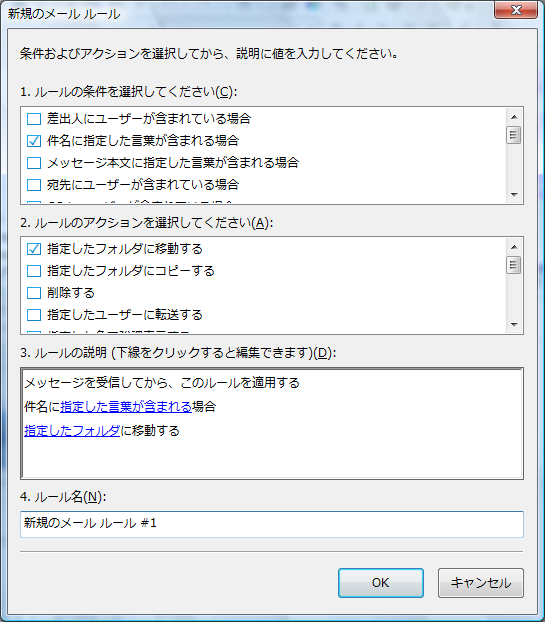
| ”新規のメールルール”ダイアログが開くので“1.ルールの条件を選択してください(C)”の中にある“件名に指定した言葉が含まれる場合”と“2.ルールのアクションを選択してください(A)”の中にある“指定したフォルダーに移動する”にチャックを入れる | |
|
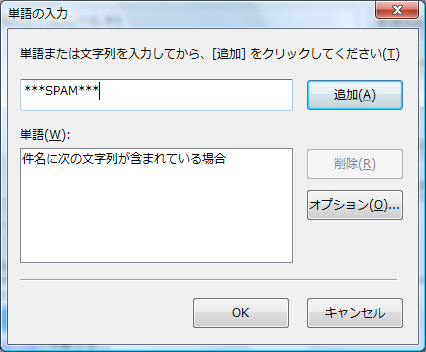
“3.ルールの説明(下線をクリックすると編集できます)(D)”の中にある“指定した言葉が含まれる”をクリック 『単語の入力』のダイアログが開 くので“単語または文字列を入力してから、「追加」をクリックしてください(T)”に“***SPAM***”を入力して“追加(A)”ボタンをクリックし“OK”ボタンをクリック |
|
|
|
|
|
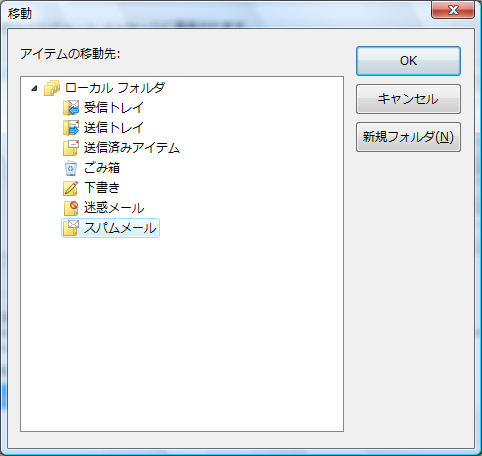
”新規のメールルール”ダイアログに戻るので“3.ルールの説明(下線をクリックすると編集できます)(D)”の中にある“指定したフォルダ”をクリック 『移動』のダイアログが開くので先ほど作った“スパムメール”をクリックして再度“OK”ボタンをクリック |
|
|
|
|
| 後は“OK”ボタンを押し続けて終了 | |
| これでスパムメールと判断されたメールは『スパムメール』フォルダーに保存されることになる | |
| ◆ | スパムメールの振り分け受信(クライアント側)確認 |
|
下記のスパムサンプルを本文に書き自分宛にメールを送ってみる XJS*C4JDBQADN1.NSBN3*2IDNEN*GTUBE-STANDARD-ANTI-UBE-TEST-EMAIL*C.34X その後、メールを受信して件名に『***SPAM***』が追加されスパムメールフォルダーに保存されていればOK |
|