| |
|
|
| ◆ |
SSL |
|
|
|
SSL通信の正当性を認証してくれる公の正規認証局から発行される証明書をWebサーバに置いておくことが必要になる
しかし、正規認証局にサーバを認証してもらうには認証局と契約をしなければな
らないし費用もかなり掛かるので自分で認証し証明書を発行する
|
|
|
|
|
| ◆ |
mod_ssl のインストール |
|
|
|
[root@centos]#
yum -y install mod_ssl
|
|
|
|
|
|
|
◆
|
各種認証キーの作成
|
|
|
|
|
|
認証キー作成ディレクトリに移動(certs ディレクトリに移動) |
|
|
|
|
|
[root@centos]#
cd /etc/pki/tls/certs
|
|
|
|
|
|
server.key (サーバー用シークレットキー)の作成
|
|
|
|
|
|
[root@centos
certs]#
make server.key
umask 77 ; \
/usr/bin/openssl genrsa -aes128 2048 > server.key
Generating RSA private key, 2048 bit long modulus
..........+++
.............................................+++
e is 65537 (0x10001)
Enter pass phrase:
******
<--- パスワード入力
Verifying - Enter pass phrase:
******
<--- 再度パスワード入力
|
|
|
|
|
Webサーバー起動時にパスワードを要求されないようにするためにサーバー用シークレットキーのパスワードを削除
|
|
|
|
|
|
[root@centos
certs]#
openssl rsa -in server.key -out server.key
Enter pass phrase for server.key:
******
<--- パスワード入力
writing RSA key
|
|
|
|
|
server.csr (サーバー用公開認証キー)の作成
|
|
|
|
|
|
[root@centos
certs]#
make
server.csr
umask
77 ; \
/usr/bin/openssl req -utf8 -new -key server.key -out server.csr
You are about to be asked to enter information that will be incorporated
into your certificate request.
What you are about to enter is what is called a Distinguished Name or a DN.
There are quite a few fields but you can leave some blank
For some fields there will be a default value,
If you enter '.', the field will be left blank.
-----
Country Name (2 letter code) [XX]: JP
<--- 国名入力
State or Province Name (full name) []:
******
<--- 都道府県名入力
Locality Name (eg, city) [Default City]: ******
<--- 市区町村名入力 (個人の場合はサーバー名)
Organization Name (eg, company) [Default Company Ltd]:Papa-Net
<--- 会社名入力
Organizational Unit Name (eg, section) []:
<--- 部署名入力(個人の場合は空白でもOK)
Common Name (eg, your name or your server's hostname) []:papa-net.info
<---
ドメインorホスト名入力
Email Address []:****@papa-net.info
<--- サーバー管理者のメールアドレス入力
Please enter the following 'extra' attributes
to be sent with your certificate request
A challenge password []:
<--- 空白のまま Enter を押す
An optional company name []:
<--- 空白のまま Enter を押す
|
|
|
|
|
サーバー用証明書の作成
|
|
|
|
|
|
[root@centos
certs]#
openssl x509 -in server.csr -out server.crt
-req -signkey server.key -days 3650
Signature
ok
subject=/C=JP/ST=******/L=******/O=Papa-Net/CN=www.papa-net.info/emailAddress=****r@papa-net.info
Getting Private key
|
|
|
|
|
|
尚、上記設定は3650日(10年間)有効なので設定日より3650日経過した場合は再度設定が必要 |
|
最後の数字(3650)は日数を表しますのでこの数字を変えることで有効期間を変えることができる |
|
|
|
|
rootのみが
SSL の内容を参照できるようにアクセス権を変更
|
|
|
|
|
|
[root@centos
certs]#
chmod -R 400
/etc/pki/tls/certs/server.*
|
|
|
|
|
|
|
◆
|
SSL
の設定
|
|
|
|
|
|
[root@centos]#
vi /etc/httpd/conf.d/ssl.conf
途中略
##
## SSL Virtual Host Context
##
<VirtualHost _default_:443>
# General setup for the virtual host, inherited from global configuration
#DocumentRoot "/var/www/html"
<--- コメント解除
↓
(ドキュメントルート(ホームぺージファイルの格納フォルダ)を変更ぢている場合は書き換え)
DocumentRoot "/home/****/www"
#ServerName
www.example.com:443
<--- コメント解除して書き換え
↓
※
server.csr (サーバー用公開認証キー)の作成で入力したドメインorホスト名
ServerName
papa-net.info:443
途中略
# SSL Protocol support:
# List the enable protocol levels with which clients will be able to
# connect. Disable SSLv2 access by default:
SSLProtocol all
-SSLv2
<--- 書き換え POODLE SSLv3.0 脆弱性問題の解決
↓
https://access.redhat.com/ja/solutions/1232613
参照
SSLProtocol
all -SSLv2 -SSLv3
途中略
# Server Certificate:
# Point SSLCertificateFile at a PEM encoded certificate. If
# the certificate is encrypted, then you will be prompted for a
# pass phrase. Note that a kill -HUP will prompt again. A new
# certificate can be generated using the genkey(1) command.
SSLCertificateFile /etc/pki/tls/certs/localhost.crt
<--- 認証キーファイルの指定
↓
SSLCertificateFile
/etc/pki/tls/certs/server.crt
# Server Private Key:
# If the key is not combined with the certificate, use this
# directive to point at the key file. Keep in mind that if
# you've both a RSA and a DSA private key you can configure
# both in parallel (to also allow the use of DSA ciphers, etc.)
SSLCertificateKeyFile /etc/pki/tls/private/localhost.key
<--- 認証キーファイルの指定
↓
SSLCertificateKeyFile
/etc/pki/tls/certs/server.key
以下略
|
|
|
|
|
|
◆
|
apacheの再起動
|
|
|
|
|
|
[root@centos]#
systemctl restart httpd.service
|
|
|
|
|
|
|
|
◆ |
表示確認 |
|
|
|
|
<Windows
Edge の場合> |
|
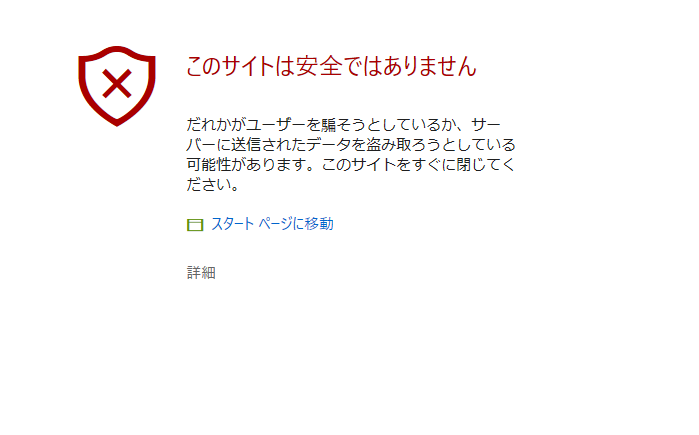
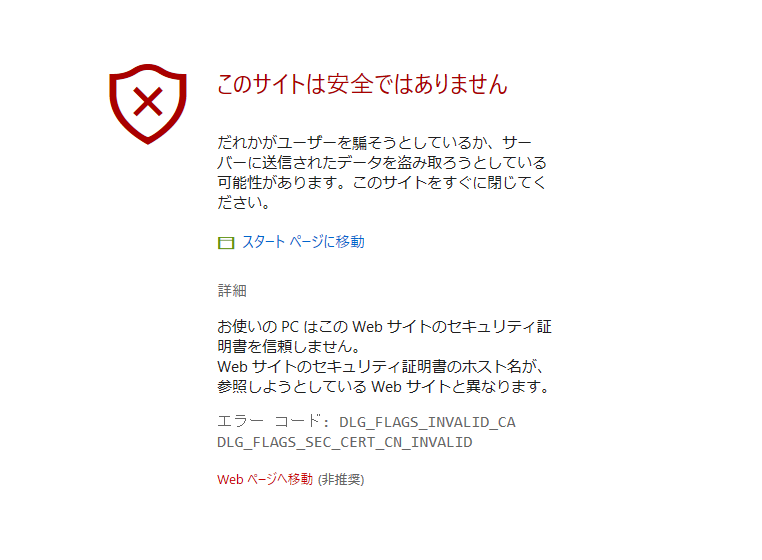
https://IPアドレス
or ドメイン名でアクセスすると下図のような『セキュリティの警告』
ページが表示されるので『詳細』をクリック |
|
|
|
 |
|
|
|
|
|
『Web
ページへ移動(非推奨)』をクリックする事により本来のページが表示される |
|
|
|
 |
|
|
|
|
|
<Windows
Internet Explorer 11 の場合> |
|
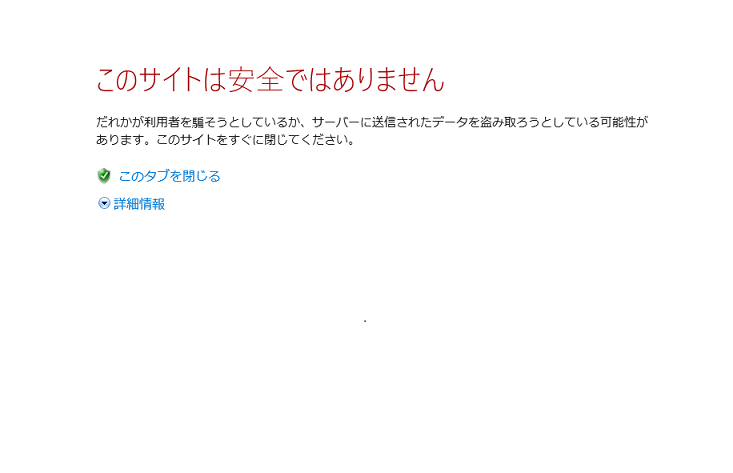
https://IPアドレス
or ドメイン名でアクセスすると下図のような『セキュリティの警告』
ページが表示されるので『詳細情報』をクリック |
|
|
|
 |
|
|
|
|
|
『Web
ページに移動(非推奨)』をクリックする事により本来のページが表示される |
|
|
|
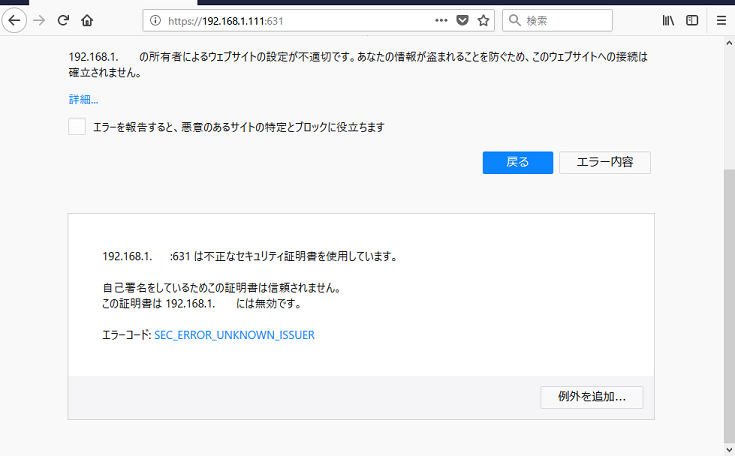
<Mozilla Firefox
59.0.3(64ビット) の場合> |
|
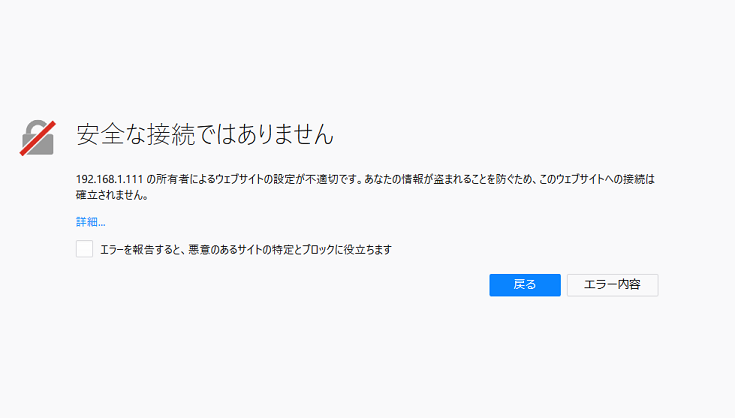
https://ドメイン
or IPアドレスでアクセスすると下図のような『セキュリティの警告』
ページが表示されるので『エラー内容』をクリック |
|
|
|
 |
|
|
|
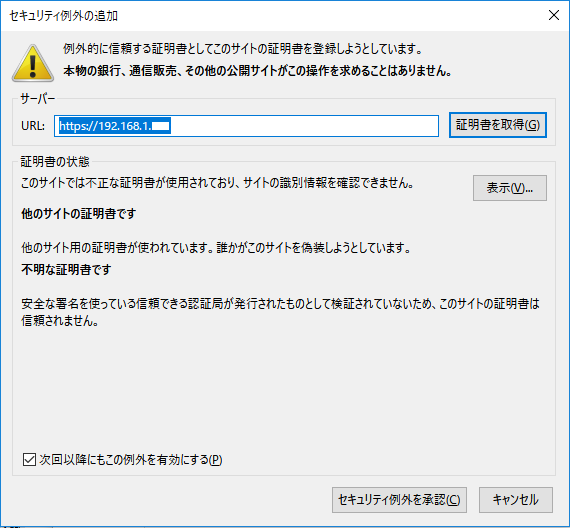
『例外を追加...』をクリック |
|
|
|
 |
|
|
|
『セキュリティ例外を承認(C)』をクリックする事により本来のページが表示される |
|
|
|
 |
|
|
|
|