 |
|
|
| ◆ | sambaのインストール |
|
[root@centos]# yum -y install samba |
|
| バージョン: samba-4.7.1-6 | |
| ◆ | samba の設定 |
|
[root@centos]# vi /etc/samba/smb.conf # See smb.conf.example for a more detailed config file or # read the smb.conf manpage. # Run 'testparm' to verify the config is correct after # you modified it. [global] (接続設定) workgroup = SAMBA <--- 書き換え(ワークグループ) ↓ workgroup = ********* server string = SAMBA SERVER Version %v <--- 追記(Samba サーバーアクセス時詳細表示名) netbios name = CentOS <--- 追記(NetBios(Windows)用 Samba サーバー名) security = user passdb backend = tdbsam unix charset = UTF-8 <--- 追記(Linux 側用文字コード) dos charset = CP932 <--- 追記(Windows 側用文字コード) wins support = yes <--- 追記(Wins(NetBios(Windows)) サーバー機能をサポートする) printing = cups printcap name = cups load printers = yes cups options = raw [homes] (共有フォルダ設定) comment = Home Directories valid users = %S, %D%w%S browseable = No <--- 書き換え(フォルダ表示) ↓ browseable = yes read only = No <--- 必要に応じ書き換え(共有フォルダ読み取り専用 通常は No) ↓ read only = yes writable = yes <--- 必要に応じ追記(共有フォルダ書き込み許可) inherit acls = Yes [printers] (プリンター設定) <--- 他のぷちんたー共有設定があったり、プリンター共有 comment = All Printers 設定を利用しない場合は以下全てコメント化 path = /var/tmp printable = Yes create mask = 0600 browseable = No [print$] (プリンター設定) <--- 他のぷちんたー共有設定があったり、プリンター共有 comment = Printer Drivers 設定を利用しない場合は以下全てコメント化 path = /var/lib/samba/drivers write list = @printadmin root force group = @printadmin create mask = 0664 directory mask = 0775 |
|
| 上記設定の構文チェック | |
|
[root@centos]# testparm Load smb config files from /etc/samba/smb.conf rlimit_max: increasing rlimit_max (1024) to minimum Windows limit (16384) Processing section "[homes]" Processing section "[printers]" Processing section "[print$]" Loaded services file OK. Server role: ROLE_STANDALONE Press enter to see a dump of your service definitions <--- Enter 以下設定内容が表示 |
|
| 上記のように OK が表示され Enter 後設定内容が表示されればOK | |
| ◆ | 共有ディレクトリの作成 |
|
[root@centos]# mkdir /home/samba |
|
| アクセス権を変更 | |
|
[root@centos]# chmod 777 /home/samba |
|
| ◆ | ユーザーの作成 |
|
[root@centos]# pdbedit -a ***** (***** ユーザー名) new password: ****** <--- パスワード入力(* は実際には表示されません) retype new password: ****** <--- パスワード再入力(* は実際には表示されません) |
|
| ◆ | ユーザー専用ディレクトリのアクセス権の設定 |
|
[root@centos]# vi /etc/samba/smb.conf [*****] <--- 以下最終行に追記(***** ユーザー名) comment = ***** Only Space path = /home/***** writable = yes (書き込みの許可 ) |
|
| 設定の詳細 path = /home/***** (***** はユーザ名) public = yes guest ok = yes guest only = yes guest account = ***** (*****
はユーザ名) read only = yes writable = yse create mask = 0777 (0777 の 777
部分に指定するアクセス権を記述) directory mask = 0777 (0777 の 777
部分に指定するアクセス権を記述) force user = yes browseable = yes valid users = ***** (***** はユーザ名) invalid users = ***** (*****
はユーザ名) write list = ***** (***** はユーザ名) hosts allow = ***** (***** はホスト名) hosts deny= ***** (***** はホスト名) 上記詳細で yes の部分を no に設定すると逆の意味になります。 |
|
| ◆ | samba の起動 |
|
[root@centos]# systemctl restart smb nmb |
|
| 自動起動設定 | |
|
[root@centos]# systemctl enable smb.service nmb.service |
|
| 自動起動設定の確認 | |
|
[root@centos]# systemctl list-unit-files | grep smb.service nmb.service smb.service enabled <--- enabled になっていればOK [root@centos]# systemctl list-unit-files | grep smb.service nmb.service nmb.service enabled <--- enabled になっていればOK |
|
| ◆ | クライアントからの接続確認 |
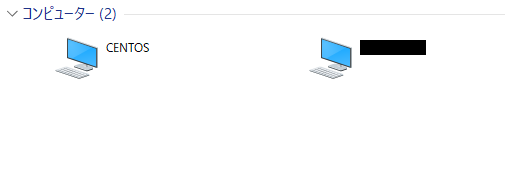
| WindowsPCのネットワークを起動し『samba の設定 』で設定した samba サーバー名『 CENTOS 』あることを確認 | |
|
|
|
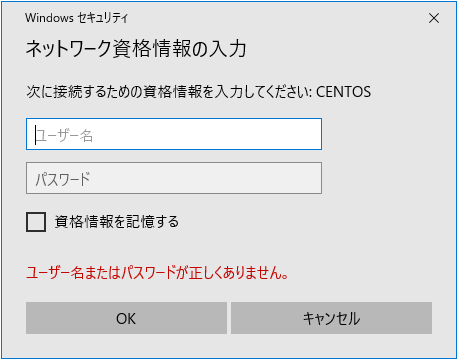
| 『 CENTOS 』にアクセスし上記で設定した『ユーザー名」・『パスワード』を入力し『OK』をクリック | |
|
|
|
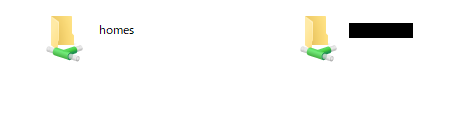
| 共有フォルダー『 homes 』と上記で設定したユーザーのフォルダーがある事を確認しそれぞれにアクセスして確認 | |
|
|
|
| ◆ | クライアントのブラウザから samba の設定 |
| samba のバージョン 4.*.* 以降が以前には利用できた samba-swat がセキュリティーの問題で利用できなくなったもようなので Webmin を利用する | |
| ◆ | Webmin のインストール |
| Webmin のインストール 及び設定は当サイトの 『サーバー機の各種設定(webmin)』 を参照 | |
| ◆ | Webmin での samba 設定 |
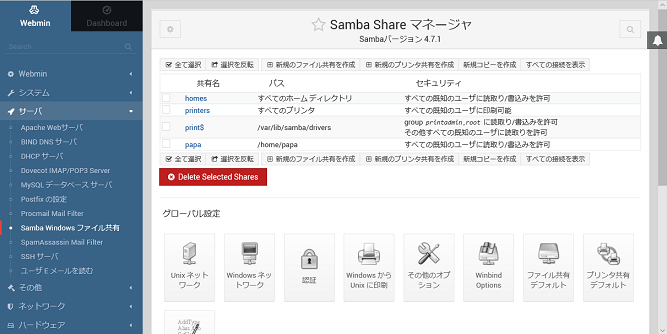
| メニューより “サーバー” ⇒ “Samba Windows ファイル共有” | |
|
|
|